 Grainy
Film Grain, Light Leaks and Vignette: How to Tune a Filter Live
A preset is a starting point. Grainy's adjust panel lets you push it further while you frame: more grain, less exposure, a warmer white balance, a light leak. Every change shows in the viewfinder as you drag. Here is what each dial does and when to use it.
A preset is a starting point. Most of the time it is exactly right, but sometimes the scene in front of you is a little too bright, a little too warm, or the grain is heavier than you want for a portrait. Grainy's adjust panel lets you fix that live, in the viewfinder, before you take the picture. This guide covers every slider, with special attention to the three things that make a photo look like film: grain, light leaks and vignette.
Why adjust before you shoot
Editing after the fact works, but adjusting live has real advantages. You see the result on the actual scene while you can still move, so you can reframe or wait for the light. You only adjust once, then shoot a whole set with the same settings. And because the adjustment is part of the photo when it is saved, there is nothing left to do afterwards. The photo in your gallery is finished.
Adjustments belong to the preset you made them on. While the app is open, Grainy remembers them for each preset separately: switch to another look and back, and your tweaks are still there, until you tap Reset.
Opening the adjust panel
Above the preset strip, to the right of the preset name, there are two icons: a heart and a slider. Tap the slider icon. The adjust panel slides up from the bottom, with a row of round values, one per adjustment, and a slider underneath for the one you have selected.
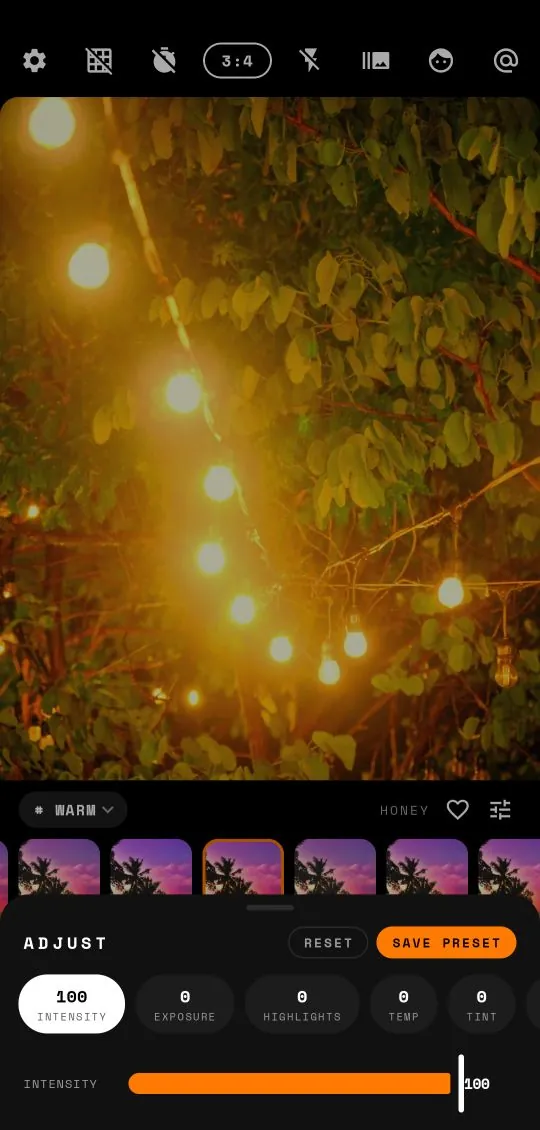
Tap any value to select it and drag the slider. The viewfinder updates instantly. Reset at the top returns every slider to the preset as it ships. Save preset stores your version as a new preset (Pro).
Every slider can be tried by anyone. Free users can save photos with intensity and exposure changed. The other sliders are part of Grainy Pro, and the panel says so: if you change one and press the shutter on the free version, Grainy offers the upgrade instead of saving. Nothing is hidden from you while you experiment.
Every slider explained
Intensity (0 to 100, free)
How strongly the preset is applied. At 100 you see the preset as designed; at 0 you see the plain camera. Around 60 to 80 is a good setting when a look is right in character but a bit too heavy, especially for skin.
Exposure (−100 to +100, free)
Brightens or darkens the whole picture. Use it when the scene is too dark or the highlights are blowing out. With faded and warm presets, a little extra exposure gives a light, airy feel; with CCD presets, a little less keeps the colours punchy.
Highlights (Pro)
Pulls the bright parts of the picture down or pushes them up without touching the shadows much. Lower it to rescue a sky; raise it for a glowing, overexposed look.
Temp and Tint (Pro)
White balance. Temp moves the colour from cool blue to warm yellow; Tint moves it from green to magenta. A small push in temp is the quickest way to change a preset's mood: a cold CCD preset becomes neutral, a warm one becomes golden.
HSL (Pro)
Fine control over eight colour ranges: red, orange, yellow, green, aqua, blue, purple and magenta. For each, you can shift its Hue, its Saturation and its Luminance. Classic uses: make greens more olive for a film look, deepen blue skies, or lower orange saturation to calm skin tones.
Vignette (Pro)
Darkens or lightens the corners relative to the preset.
Grain (Pro)
Adds or removes grain relative to the preset.
Leak (Pro)
Turns the light leak on or off.
The last three have their own sections below, because they are what make a digital photo feel analog.
Getting grain right
Film grain is the texture of the film itself: tiny particles of silver or dye that show up as fine noise, most visible in mid-tones and smooth areas such as skies and skin. It softens the clinical sharpness of a digital file and hides small flaws. Every Grainy preset already has a grain level suited to its look; the Grain slider moves it up or down from there.
- Portraits: lower the grain a little. Heavy grain on skin can look like blemishes.
- Black and white: raise it. Monochrome and grain belong together, and Grainy's mono presets already lean heavy.
- Night scenes: moderate grain hides real sensor noise and makes it look intentional.
- Small screens: remember that most people will see your photo on a phone. Grain that looks strong in the viewfinder is often just right once the photo is shared.
One note on the CCD family: the colour noise that Grainy adds to saved CCD photos is a separate effect from this grain. It imitates a digital sensor rather than film, and it is part of the CCD habits.
Light leaks
A light leak happens when light sneaks into a film camera through a gap in the body or when the back is opened. It shows up as a warm orange or red glow, usually from one edge of the frame. Photographers once considered it a fault; now it is one of the most loved signs of analog photography.
Some presets ship with a leak built in. The Leak switch in the adjust panel overrides the preset either way: turn it on to add a leak to any preset, or off to remove one you do not want.
Light leaks work best:
- in bright, warm scenes such as beaches and golden hour, where the glow looks natural;
- with Faded and Warm presets, which already have the colours of old film;
- sparingly. One or two leaky frames in a set of ten feel like happy accidents. Ten in a row feel like a filter.
Leaks are less convincing with the Clean family, whose whole point is a crisp, modern look.
Vignette
A vignette is the darkening of the corners of a photo. Old and cheap lenses did it naturally, and it draws the eye towards the centre of the frame. Each preset has its own vignette; the slider makes it stronger or weaker.
- Raise it for a centred subject, such as a portrait, a coffee cup or a single flower, or for a toy-camera feel.
- Lower it for landscapes, architecture and flat lays, where dark corners can look like a mistake, and for collages, where every cell would get its own dark corners.
Five recipes to try
Starting points, not rules. Pick the family, then adjust from the preset as it ships.
- Softer CCD portrait: any Digicam / CCD preset, intensity around 75, exposure slightly up. Keeps the digicam feel but is kinder to faces.
- Summer film: a Faded preset, temp up a little, leak on, grain up a touch. Beach days and holiday streets.
- Moody street: a Cinematic preset, highlights down, vignette up, blue saturation down slightly in HSL. Rain and city nights.
- Gritty black and white: a Mono preset, grain well up, exposure slightly down. Strong shadows and textures.
- Warm interior: a Warm preset, intensity around 80, orange saturation down slightly in HSL so skin does not go too orange. Cafés and dinners.
Adjusting in tricky light
Most of the time, two sliders are enough: intensity and exposure. But some situations reward a few seconds with the others.
Bright sky, dark subject
A friend against a bright window or a sunset. Tap the viewfinder on the subject to focus, raise exposure until the face looks right, then pull highlights down so the sky keeps some colour. If the sky still clips, accept it: it is part of the retro look.
Orange street lights
Sodium lamps turn everything orange. A Black and white preset is one answer. Another is to lower temp and lower orange saturation in HSL, which leaves a moody, cooler night.
Fluorescent offices and shops
These lights often give a green cast. Push tint slightly towards magenta to neutralise it, or lean into the green with a CCD preset for an authentic early-digital feel.
Candlelight and dim restaurants
Raise exposure, keep the grain moderate so noise looks like film, and choose a Warm preset. Use the 3 second timer and rest the phone on the table for a sharper shot.
Midday sun
Lower exposure a little and choose a Faded preset; its lifted blacks soften hard shadows. A light leak can turn the harsh light into a feature.
Saving your own preset
When you have a combination you love, tap Save preset at the top of the adjust panel (Pro). It is stored with your adjustments and appears under Saved in the presets panel, where you can pick it like any other preset. It is a great way to build a signature look you can come back to for every set, so your feed stays consistent over months.
The same sliders are available when you edit a photo that is already on your phone, in Grainy's Studio. The Studio adds a Detail slider and the beauty options too. See editing gallery photos in Studio.
Frequently asked questions
How do I add film grain to a photo?
Open the adjust panel with the slider icon next to the heart above the preset strip, choose Grain and drag. The grain shows live, and it is saved into the photo.
Which adjust tools are free?
Intensity and exposure are free to save. Highlights, temperature, tint, HSL, vignette, grain and light leak can be tried live by anyone and are saved with Grainy Pro.
How do I reset my adjustments?
Tap Reset in the adjust panel to go back to the preset as it was designed.
Can I save my adjusted preset?
Yes, with Grainy Pro. Tap Save preset in the adjust panel and it appears under Saved in the presets panel.